You may have already noticed that when you place an image on button in WPF, it doesn't display it well. In this post I will show you how to make your buttons look nice.
Introduction
The best way to do this is to create a new style that you will apply to your buttons when there are holding an image.
Of course you can put as many properties as you want in your style, create more styles and reuse them as you need.
How to do it
Have a look at this style, you can copy and paste it directly in your Style.xaml and use it for your buttons: Style="{StaticResource BtnStyleImage}"
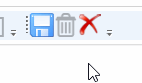 |
| On the left is the modified button, on the right is the original one. |
Introduction
The best way to do this is to create a new style that you will apply to your buttons when there are holding an image.
Of course you can put as many properties as you want in your style, create more styles and reuse them as you need.
- In my example the button initially has an opacity of 70% and when the mouse is over it, it becomes 100%.
- The button in the middle is disabled, in this case its opacity is 30%.
- When the button is clicked, it becomes smaller and gives a visual feedback.
How to do it
In order to achieve this, you will use what is called ControlTemplate together with Trigger.
"ControlTemplate" will allow us to customize the appearance depending on some specific conditions with the usage of "Trigger".
Have a look at this style, you can copy and paste it directly in your Style.xaml and use it for your buttons: Style="{StaticResource BtnStyleImage}"
The image path is defined in your main xaml file, and this line : <Border
Name="border"
Background="{TemplateBinding
Background}"/> informs the style to use the existing background so you can apply a different image for each button using this style.
The triggering is obvious: <Trigger
Property="IsMouseOver"
Value="True"> by example occurs when the condition "IsMouseOver" is True.
The trick to reduce the size of the image when the button is clicked is this:
<Setter
TargetName="border"
Property="BorderBrush"
Value="Transparent"/>
<Setter
TargetName="border"
Property="BorderThickness"
Value="4"/>
By applying a transparent border you can choose how much reduction you want to apply.
Conclusion
It was a very short post, the purpose is always to give a useful and pertinent example together with some explanations so that it can be either reused directly or customized easily.
Conclusion
It was a very short post, the purpose is always to give a useful and pertinent example together with some explanations so that it can be either reused directly or customized easily.
I hope this post was useful to someone and worth to read it.
Do not hesitate to help me to improve it, any new idea or suggestion is welcome.

No comments:
Post a Comment